Free Pattern Friday: Freezer Bunny Amigurumi

fbunnyAll

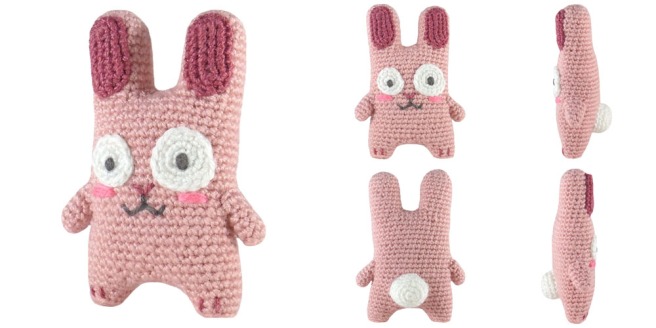
A 5″ tall amigurumi of the Freezer Bunny from The Sims games.

Tooootally haven’t made this guy before, and certainly not twice. Nope, not me. But this is the last one ever I promise

Lately I’ve been playing more with shapes and working limbs and bodies in one piece, which isn’t too hard to do, but it’s a huge pain to write out what you’re doing. I tried to be clear but I also didn’t want to write a novel, so let me know if there’s any questions. Just to double check I did go and follow the pattern to make a test piece and I got it to come out, so hopefully it shouldn’t be too bad.

And because I love comparing old crap to new crap, here’s all three Freezer Bunnys:

fbunnyCompare
I used the same color light pink in all three pieces. Welcome to bad lighting meets bad photoshopping.

Well that was a horrifying trip down memory lane. You can find the patterns for the first two on my old blog, but why would you want to? No link because I’m pretending it doesn’t exist.

I’ve also finally started using chain one, turn (c1t) in my patterns. Normally I don’t chain one when turning. I have no real reason why. I have no real reason to start chaining one. But I guess it’s happening so whatever.

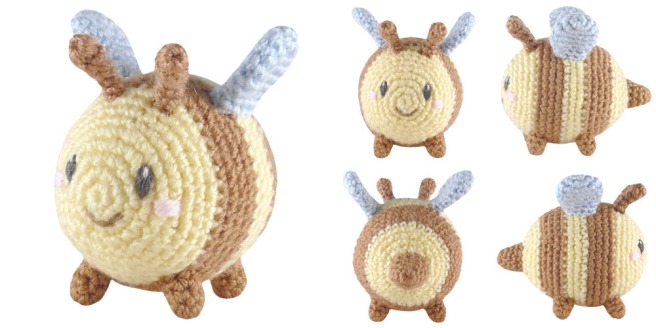
Candy corn guy probably coming out next FPF. Or maybe a bat. Whichever one I like the least. 😛

This is an icrochetthings original pattern © 2017. Do not claim as your own. Do not copy, sell, or distribute this pattern. Do not sell any products made from this pattern. Freezer Bunny belongs to ElectronicArts Inc.

Materials

▪ DK weight yarn in light pink, medium pink, dark pink, white, dark grey
▪ B hook (2.25 mm)
▪ Stuffing
▪ Scissors
▪ Tapestry needle

Difficulty

Medium-Easy – You should know how to work in the round, increase, decrease, and work in the back loops.

Body

Starting with light pink

Ear 1
1.  ch 2, 6 sc in 1st ch  (6)
2.  [inc] around  (12)
3.  [sc, inc] around  (18)
4 – 11.  [sc] around  (18)

F/O

Spacer 1
1. ch 4, [sc] across  (3)
2 – 4. c1t, [sc] across  (3)

F/O, leave long tail for sewing

Ear 2
Work the same as Ear 1, DO NO T F/O
12.  [sc] across one of the shorter sides of Spacer 1,
sc into one of the sts of Ear 1, 15 sc, sk last 2 sts of Ear 1,
[sc] across the other short side of Spacer 1,
sk next 2 sts of Ear 2, sc into the next st of Ear 2, 15 sc  (38)
Use the tail from Spacer 1 to sew the holes between the spacer and the ears shut
13 – 31.  [sc] around  (38)
Stuff
32.  4 sc (continue to Leg 1)

Leg 1
1.  ch 4, sk 22 sts, sc into next st
You should now have a ring made up of 16 sts of the body and 4 chs, continue working around this ring
Mark the last st of the previous round as the first st of the next round
2.  [sc] around  (20)
3.  dec, 12 sc, 3 dec  (16)
4.  [sc] around  (16)
5.  dec, 8 sc, 3 dec  (12)
6.  [sc] around  (12)
7.  [BLO dec] around  (6)

F/O, sew shut

Leg 2
Starting from the last st of round 32 of the body, sk next 19 sts of the body, attach new strand of light pink yarn, sc in the next st
1.  ch 4, count backwards 16 sts and sc in the 16th st
You should now have another ring made up of 16 sts of the body and 4 chs, continue working around this ring (there should be 3 unworked stitches on either side of the body, forming a gap between the legs)
Work the same as Leg 1 starting from round 2
Stuff both legs

Spacer 2
Work the same as Spacer 1
Sew Spacer 2 between the legs, sealing the gap

2 Inner Ears

Starting with dark pink

1.  ch 9, [sc] across, working on the opposite side of the chs: [sc] across  (16)
2.  [sc, inc, 4 sc, inc, sc] around  (20)

F/O, leave long tail for sewing

2 Arms

Starting with light pink

1.  ch 2, 6 sc in 1st ch  (6)
2.  [sc, inc] around  (9)
3 – 5.  [sc] around  (9)
6.  Turn, 6 sc  (6)

F/O, leave long tail for sewing

Small Eye

Starting with white

1.  ch 2, 6 sc in 1st ch  (6)
2.  [inc] around  (12)

F/O, leave long tail for sewing

Large Eye

Starting with white

1.  ch 2, 6 sc in 1st ch  (6)
2.  [inc] around  (12)
3.  [3 sc, inc] around  (15)

F/O, leave long tail for sewing

Tail

Starting with white

1.  ch 2, 6 sc in 1st ch  (6)
2.  [inc] around  (12)
3.  [sc, inc] around  (18)
4 – 5.  [sc] around  (18)

F/O, leave long tail for sewing

Assembly

▪ Sew an inner ear onto each ear
▪ Sew the arms on either side of the body, stuffing as you go
▪ Use dark grey yarn to embroider pupils onto each eye
▪ Sew the small eye onto the left side of front of the body
▪ Sew the large eye onto the right side of the front of the body
▪ Use dark pink yarn to embroider a nose onto the body
▪ Use dark grey yarn to embroider a mouth onto the body
▪ Use medium pink yarn to embroider blush marks onto the body
▪ Use dark pink yarn to embroider toes onto the legs
▪ Sew the tail onto the back of the body, stuffing as you go

2 minutes before midnight still counts as Friday to me!

Pattern: Pumpkaboo Amigurumi

A 6″ tall amigurumi of the Pokemon Pumpkaboo.

The pattern is available on Ravelry and on Etsy.

Welp, it’s time to jump on the Halloween train and pump out a bunch of spooky scary patterns. I’ve never really done holiday-themed items but I’m totally selling out this year. I’ve got a candy-corn pattern lined up for Free Pattern Friday, and I’m currently working on a bat. Hooray for being boring!

I love Pumpkaboo’s design but I’ve never really used one in-game because I can’t stand Gen 6 for some reason. Plus it’s evolution isn’t nearly as cute. :[

I do have a couple non-holiday related patterns that are almost done so they should go up sometime soon. They’re both things I’ve already done but I completely overhauled the patterns. I know I do too much fixing of old stuff instead of new ones, but the holiday shenanigans should remedy that.

Free Pattern Friday: Bumblebee Amigurumi

beeAll

Iiiiiiiiiiit’s Friday. Here’s a pattern of a 3″ tall bumblebee.

Little piece of advice: don’t buy Stardew Valley unless you want to lose a month of your life. Not that that happened to me or anything, no siree.

I don’t have much to say about this, just kinda practicing embroidering eyes and stuff.

This is an icrochetthings original pattern © 2017. Do not claim as your own. Do not copy, sell, or distribute this pattern. Do not sell any products made from this pattern.

Materials

▪ DK weight yarn in yellow, brown, blue, pink, dark grey, white
▪ B hook (2.25 mm)
▪ Stuffing
▪ Scissors
▪ Tapestry needle

Difficulty

Easy – You should know how to work in the round, increase, decrease, work in the front loops, and change colors.

Body

Starting with yellow

1.  ch 2, 6 sc in 1st ch  (6)
2.  [inc] around  (12)
3.  [sc, inc] around  (18)
4.  [2 sc, inc] around  (24)
5.  [3 sc, inc] around  (30)
6.  [sc] around  (30)
7.  [4 sc, inc] around  (36)
8.  [sc] around  (36)
9.  [5 sc, inc] around  (42)
10 – 13.  Attach brown – [sc] around  (42)
14 – 16.  With yellow – [sc] around  (42)
17 – 18.  With brown – [sc] around  (42)
19.  [5 sc, dec] around  (36)
20.  [sc] around  (36) – Break off brown
21.  [4 sc, dec] around  (30)
22.  [sc] around  (30)
23.  [3 sc, dec] around  (24)
Stuff
24.  [2 sc, dec] around  (18)
25.  [sc, dec] around  (12)
26.  [dec] around  (6)

F/O, sew shut

2 Antennae

Starting with brown

1.  ch 2, 6 sc in 1st ch  (6)
2.  [sc] around  (6)
3.  [sc, dec] around  (4)
4 – 5.  [FLO: sc] around  (4)

F/O, leave long tail for sewing

2 Wings

Starting with blue

1.  ch 2, 6 sc in 1st ch  (6)
2.  [inc] around  (12)
3.  [sc, inc] around  (18)
4.  [sc] around  (18)
5.  [4 sc, dec] around  (15)
6.  [3 sc, dec] around  (12)
7.  [2 sc, dec] around  (9)
8.  [sc] around  (9)

F/O, leave long tail for sewing

Stinger

Starting with brown

1.  ch 2, 6 sc in 1st ch  (6)
2.  [sc, inc] around  (9)
3.  [2 sc, inc] around  (12)
4.  [sc] around  (12)

F/O, leave long tail for sewing

4 Legs

Starting with brown

1.  ch 2, 6 sc in 1st ch  (6)
2 – 3.  [sc] around  (6)

F/O, leave long tail for sewing

Assembly

▪ Use dark grey yarn to embroider eyes onto the body
▪ Use white yarn to embroider shines onto the eyes
▪ Use brown yarn to embroider a mouth onto the body
▪ Use pink yarn to embroider blush marks onto the body
▪ Sew the wings on either side of the body
▪ Sew the antennae onto the front of the body
▪ Sew the stinger onto the back of the body, stuffing as you go
▪ Sew the legs onto the bottom of the body

Pattern: Chubbachu Amigurumi

A 5″ tall amigurumi of a chubby Pikachu.

The pattern is available on Ravelry and on Etsy.

Fat Pikachu is best Pikachu.

Making this was a new experience for me. I don’t tend to go beyond 48 stitches around when doing amigurumi because I prefer them small, but I decided I would try something different. I planned how big I wanted it, made a little schematic, and stuck to it. I do like how it turned out, and planning out my amigurumi in advance instead of just winging it made my life a hell of a lot easier. Definitely going to stick to that.

I also made new graphics for my Etsy shop and this is the first  thing to make use of them. Now I just have to take pictures of everything again so it matches the new style. D:
Perfectionism is a disease.

Get the pattern on Ravelry or Etsy.

Free Pattern Friday: Poké Ball Amigurumi

pokeAll

A 2.5″ amigurumi of a Poké Ball.

I have pretty much nothing to say about this other than I could’ve sworn that I uploaded a Poké Ball pattern years ago (oh my god I’ve been doing this for years), but apparently not. My plan for this is to make all of the balls and sell the patterns in one big set, but knowing me the odds of that happening are practically zero.

One day I’ll upload something that isn’t FPF. I spent all day yesterday working on graphics for my Etsy shop and now my obsessive perfectionism wants me to retake pictures of everything. So I’m dealing with that.

This is an icrochetthings original pattern © 2017. Do not claim as your own. Do not copy, sell, or distribute this pattern. Do not sell any products made from this pattern. Pokémon belongs to Nintendo.

Materials

▪ DK weight yarn in red, white, dark grey
▪ B hook (2.25 mm)
▪ Stuffing
▪ Scissors
▪ Tapestry needle

Difficulty

Easy – You should know how to work in the round, increase, decrease, and change colors.

Ball

Starting with red

1.  ch 2, 6 sc in 1st ch  (6)
2.  [inc] around  (12)
3.  [sc, inc] around  (18)
4.  [2 sc, inc] around  (24)
5.  [3 sc, inc] around  (30)
6.  [4 sc, inc] around  (36)
7.  [5 sc, inc] around  (42)
8.  [sc] around  (42)
9.  [6 sc, inc] around  (48)
10 – 11.  [sc] around  (48) – Break off red
12 – 13.  Attach dark grey – [sc] around  (48) – Break off dark grey
14 – 15.  Attach white – [sc] around  (48)
16.  [6 sc, dec] around  (42)
17.  [sc] around  (42)
18.  [5 sc, dec] around  (36)
19.  [4 sc, dec] around  (30)
20.  [3 sc, dec] around  (24)
Stuff
21.  [2 sc, dec] around  (18)
22.  [sc, dec] around  (12)
23.  [dec] around  (6)

F/O, sew shut

Large Button

Starting with dark grey

1.  ch 2, 6 sc in 1st ch  (6)
2.  [inc] around  (12)
3.  [sc, inc] three times  (9)

F/O, leave long tail for sewing

Small Button

Starting with white

1.  ch 2, 6 sc in 1st ch  (6)
2.  [sc, inc] around  (9)

F/O, leave long tail for sewing

Assembly

▪ Sew the large button onto the ball
▪ Sew the small button onto the large button

TGIF and welcome to the last weekend where I’ll experience true happiness for at least a year.
Cleganebowl get hype

Free Pattern Friday: Ice Cream Monster Amigurumi

iceAll
A 4″ tall amigurumi of an ice cream monster dude.

What is this, the third FPF in a row? It’s almost like I’m not lazy.

If you follow me on my rarely-used Tumblr you may have seen something like this a while ago. I came up with an idea for a silly little creature (maybe a form of octopus?) that looks like ice cream and wears a cone as a hat. I made like 5 different flavors, but then came the Great Scrappening and many yarn lives were lost. This one was whipped up earlier today (yay procrastination).

This is an icrochetthings original pattern © 2017. Do not claim as your own. Do not copy, sell, or distribute this pattern. Do not sell any products made from this pattern.

Materials

▪ DK weight yarn in green, beige, brown, dark grey
▪ B hook (2.25 mm)
▪ Stuffing
▪ 6 mm safety eyes
▪ Scissors
▪ Tapestry needle

Difficulty

Easy – You should know how to work in the round, increase, decrease, half double crochet, and slip stitch.

Ice Cream

Starting with green

1.  ch 2, 6 sc in 1st ch  (6)
2.  [inc] around  (12)
3.  [sc, inc] around  (18)
4.  [2 sc, inc] around  (24)
5.  [3 sc, inc] around  (30)
6.  [4 sc, inc] around  (36)
7.  [sc] around  (36)
8.  [5 sc, inc] around  (42)
9 – 13.  [sc] around  (42)
14.  [5 sc, dec] around  (36)
15.  [sc] around  (36)
16.  FLO: [ss, 4 hdc in same st, ss] around  (72)
17.  Working in the unused back loops of the previous round: [4 sc, dec] around  (30)
18.  [3 sc, dec] around  (24)
Stuff and attach safety eyes (I placed mine between rounds 10 and 11 at about 9 sts apart)
19.  [2 sc, dec] around  (18)
20.  [sc, dec] around  (12)
21.  [dec] around  (6)

F/O, sew shut

Cone

Starting with beige

1.  ch 2, 6 sc in 1st ch  (6)
2.  [sc, inc] around  (9)
3.  [2 sc, inc] around  (12)
4.  [3 sc, inc] around  (15)
5.  [4 sc, inc] around  (18)
6.  [sc] around  (18)
7.  [5 sc, inc] around  (21)
8.  [sc] around  (21)
9.  [6 sc, inc] around  (24)
10.  [sc] around  (24)
11.  [7 sc, inc] around  (27)
12.  [sc] around  (27)

F/O, leave long tail for sewing

Assembly

▪ Use black yarn to embroider a mouth onto the ice cream
▪ Sew the cone onto the ice cream, stuffing as you go
▪ Use brown yarn to embroider chocolate chips onto the ice cream

Free Pattern Friday: Pyukumuku Amigurumi

mukuAll

A 2″ tall, 3″ long amigurumi of the Pokemon Pyukumuku.

So it’s yesterday afternoon and I don’t have any free patterns ready so I looked through all the Pokemon and picked one that would work up fast and here we are. Not super happy with it but that’s what I get for trying to quickly whip up something. Took about 2 hours maybe(?), but I spent way more time than necessary trying to figure out the eyes and mouth…thing. I remembered I had some embroidery floss from my brief stint of cross-stitching so I slapped that on there. Not sure if I like it enough to use in future pieces but we’ll see.

This is an icrochetthings original pattern © 2017. Do not claim as your own. Do not copy, sell, or distribute this pattern. Do not sell any products made from this pattern. Pyukumuku belongs to Nintendo.

Materials

▪ DK weight yarn in dark grey, pink, white
▪ Embroidery floss in pink, white
▪ B hook (2.25 mm)
▪ Stuffing
▪ Scissors
▪ Tapestry needle

Difficulty

Easy – You should know how to work in the round, increase, and decrease.

Body

Starting with dark grey

1.  ch 2, 6 sc in 1st ch  (6)
2.  [inc] around  (12)
3.  [sc, inc] around  (18)
4.  [2 sc, inc] around  (24)
5.  [3 sc, inc] three times, 12 sc  (27)
6.  [4 sc, inc] three times, 12 sc  (30)
7.  [5 sc, inc] three times, 12 sc  (33)
8.  [6 sc, inc] three times, 12 sc  (36)
9 – 18.  [sc] around  (36)
19.  [4 sc, dec] around  (30)
20 – 21.  [sc] around  (30)
22.  [3 sc, dec] around  (24)
23.  [sc] around  (24)
24.  [2 sc, dec] around  (18)
Stuff
25.  [sc, dec] around  (12)
26.  [dec] around  (6)

F/O, sew shut

Tail

Starting with white

1.  ch 2, 6 sc in 1st ch  (6)
2.  [inc] around  (12)
3 – 5.  [sc] around  (12)
6.  [sc, dec] around  (8)
Stuff

F/O, leave long tail for sewing

4 Small Spikes

Starting with pink

1.  ch 2, 6 sc in 1st ch  (6)
2.  [2 sc, inc] around  (8)
3.  [3 sc, inc] around  (10)
4.  [sc] around  (10)
5.  [4 sc, inc] around  (12)

F/O, leave long tail for sewing

2 Large Spikes

Starting with pink

1.  ch 2, 6 sc in 1st ch  (6)
2.  [2 sc, inc] around  (8)
3.  [3 sc, inc] around  (10)
4.  [sc] around  (10)
5.  [4 sc, inc] around  (12)
6.  [sc] around  (12)
7.  [5 sc, inc] around  (14)

F/O, leave long tail for sewing

Assembly

▪ Use pink embroidery floss to embroider two eyes onto the front of body
▪ Use white embroidery floss to embroider a star between the eyes
▪ Sew two small spikes above the eyes, stuffing as you go
▪ Sew the two large spikes next to the small spikes, stuffing as you go
▪ Sew the remaining two small spikes next to the large spikes, stuffing as you go
▪ Sew the tail onto the back of the body


Pattern: Blobfish Amigurumi

A 2” tall, 5” long amigurumi of a blobfish.

The pattern is available on Ravelry and on Etsy.

So a couple of weeks ago I randomly remembered that this creature exists and decided to crochet it. This was the first time in a while I played with weird body shapes and I think it turned out pretty good. Pretty blobby.

Apologies for no Free Pattern Friday last week, but very bad things happened on Thurday. Veeeery bad things. Bad things on top of  bad things. Ol’ blobby’s face here pretty much sums it up. But at least I’ve been super motivated to crochet lately so I have a bunch of patterns ready to be typed up. Might be a free one this week but I just frogged what I was working on because perfectionism is a crippling disease. Off to think of something quick and simple to make.

Get the pattern on Ravelry or Etsy.

Free Pattern Friday: Cactus Bunny Amigurumi

bunnyAll

A 4″ tall amigurumi of a cactus bunny…topiary…plant thing.

In my quest of scouring the internet for cute things to crochet I found a picture of this thing. So I made it. Woo.

With this I was playing around with working in the posts, so you might need to google working in the back posts with single crochet if you’re not familiar with it. I like the effect it gives and I’ve used it in a revamp of my Cookie Mouse amigurumi that may or may not be posted soon.

Also I’ve added a page for the master key so check that out up top if you forget what something means (underlines perhaps?).

Materials

▪ DK weight yarn in green, cream, white, pink, dark grey
▪ C hook (2.75 mm)
▪ Stuffing
▪ 6 mm safety eyes
▪ Scissors
▪ Tapestry needle

Difficulty

Medium-Easy – You should know how to work in the round, increase, decrease, half double crochet, puff stitch, work in the front and back loops, and work in the back posts.

Head

Starting with green

1.  ch 2, 6 sc in 1st ch  (6)
2.  [inc] around  (12)
3.  [sc, inc] around  (18)
4.  [2 sc, inc] around  (24)
5.  [3 sc, inc] around  (30)
6.  [4 sc, inc] around  (36)
7.  [5 sc, inc] around  (42)
8 – 14.  [sc] around  (42)
15.  [5 sc, dec] around  (36)
16.  [4 sc, dec] around  (30)
Stuff and attach safety eyes (I placed mine between rounds 11 and 12 at about 9 sts apart)

F/O, leave long tail for sewing

2 Ears

Starting with green

1.  ch 2, 6 sc in 1st ch  (6)
2.  [sc, inc] around  (9)
3.  [2 sc, inc] around  (12)
4.  [sc] around  (12)
5.  [3 sc, inc] around  (15)
6.  [sc] around  (15)
7.  [3 sc, dec] around  (12)
8.  [sc] around  (12)
9.  [2 sc, dec] around  (9)
Stuff

F/O, leave long tail for sewing

Face Patch

Starting with white

1.  ch 2, 6 sc in 1st ch  (6)
2.  [inc] around  (12)

F/O, leave long tail for sewing

Flower

Starting with pink

1.  ch 2, 6 sc in 1st ch  (6)
2.  [puff, ss] around  (12)

F/O, leave long tail for sewing

2 Arms

Starting with green

1.  ch 2, 6 sc in 1st ch  (6)
2 – 3.  [sc] around  (6)
4.  Fold in half, [sc] across the top  (3)

F/O, leave long tail for sewing

Pot

Starting with cream

1.  ch 2, 6 sc in 1st ch  (6)
2.  [inc] around  (12)
3.  [sc, inc] around  (18)
4.  [2 sc, inc] around  (24)
5.  [BLO sc] around  (24)
6.  [sc] around  (24)
7.  [3 sc, inc] around  (30)
8 – 9.  [sc] around  (30)
10.  [FLO hdc] around  (30)
11.  [sc] around in the third loop (30)
12.  [BPO sc] around  (30)

F/O

Assembly

▪ Sew the face patch onto the head
▪ Use dark grey yarn to embroider a mouth onto the patch
▪ Use pink yarn to embroider blush marks on either side of the eyes
▪ Sew the ears on either side of the head
▪ Sew the flower in front of an ear
▪ Use white yarn to embroider an “x” onto the flower
▪ Sew the head onto the top of the pot
▪ Sew the arms onto the top of the pot

I’d say TGIF but Sundays are the only days that matter for the next 6 weeks. Happy crocheting anyways. 😛

Free Pattern: Luma Amigurumi

A 3″ tall amigurumi of a Luma from Super Mario Galaxy.

Paaaaaaattern update. After acquiring my beautiful new Stylecraft Special DK yarn I needed something to try it out on and since I only had a limited amount of colors I chose this. Plus I’ve been wanting to fix this pattern for a while because the little swirl at the top of the body was needlessly complex. Here’s the before and after:

lumaBoth

Soooo much better.

Changes:
– Edited body pattern to make it easier
– Slightly edited the patterns of the arms and legs
– No more disgusting felt eyes
– Used different colored yarn

This is an icrochetthings original pattern © 2017. Do not claim as your own. Do not copy, sell, or distribute this pattern. Do not sell any products made from this pattern.

Materials

▪ DK weight yarn in yellow, dark grey, white
▪ C hook (2.75 mm)
▪ Stuffing
▪ Scissors
▪ Tapestry needle

Difficulty

Easy – You should know how to work in the round, increase, and decrease.

Body

Starting with yellow

1.  ch 2, 6 sc in 1st ch ( 6)
2.  [inc] around  (12)
3.  [sc, inc] around  (18)
4.  [2 sc, inc] around  (24)
5.  [3 sc, inc] around  (30)
6.  [4 sc, inc] around  (36)
7 – 12.  [sc] around  (36)
13.  [4 sc, dec] around  (30)
14.  [sc] around  (30)
15.  [3 sc, dec] around  (24)
16.  [sc] around  (24)
17.  [2 sc, dec] around  (18)
18 – 19.  [sc] around  (18)
Stuff
20.  [sc, dec] around  (12)
21.  [sc] around  (12)
22.  [2 sc, dec] around  (9)
23.  Turn, 5 sc  (5)
24.  Turn, 5 sc, [sc] into the unused stitches of round 22 (9)
25. [sc] around (9)
Stuff
26.  [sc, dec] around  (6)
27.  [sc] around  (6)

F/O, sew shut

2 Legs

Starting with yellow

1.  ch 2, 6 sc in 1st ch  (6)
2.  [sc, inc] around  (9)
3.  [sc] around  (9)
4.  [2 sc, inc] around  (12)
5.  [sc] around  (12)
6.  Turn, 6 sc  (6)

F/O, leave long tail for sewing

2 Arms

Starting with yellow

1.  ch 2, 6 sc in 1st ch  (6)
2.  [sc, inc] around  (9)
3.  [sc] around  (9)
4.  [2 sc, inc] around  (12)
5.  [sc] around  (12)

F/O, leave long tail for sewing

Assembly

▪ Sew the arms on either side of the body, stuffing as you go
▪ Sew the legs onto the bottom of the body, stuffing as you go
▪ Use dark grey yarn to embroider eyes onto the body
▪ Use white yarn to embroider shines onto the eyes